Normally I am skeptical of “upgrades” to software, especially big-name software like Photoshop and no Lightroom. However, Adobe has actually improved Lightroom AND lowered the retail price to $149 and upgrading from LR 3 costs $79! I think it is worth it, and I’ll try to explain why by explaining the new features, and improvements on existing features.
Right up front, Lightroom now has significant support for video files, and by “significant” I mean you can actually do some editing inside of Lightroom. I don’t shoot video so I have never even imported a video clip into LR, much-less edited one. If you want to learn about the new video features in LR 4, you’ll have to look elsewhere.
Opening LR 3 files in LR 4
What? There is no such thing as a native Lightroom file. Why did I imply so in this header? If you choose to work on an image in the Develop module that you previously worked on in LR 3, you’ll see the exact same sliders in the Basic editing section that were there in LR 3. However, you have the option of applying the newer processing technology to this image, and when you opt to do so, you’ll see several new sliders magically appear as well as some sliders that were available in LR 3 disappear. OK, the ability to choose earlier processing isn’t new to LR 4, but the processing engine has been rewritten and IMHO greatly improved upon, so its great that you can have the option apply the newest processing technology or not, and in most cases doing so is the way to go.
However, there is ONE scenario where I prefer the older LR 3 processor, and that is when I want to fake a surreal HDR look by increasing Fill Light and Clarity to the max. Due to the changes in LR 4, getting this look is much more difficult, because it turns out the stuff that made it so easy to create this look in LR 3 were actually flaws in the processing that Adobe corrected.
The photo on the left was created using the fake HDR processing in LR 3, which the photo on the right was created by opting to apply the newwst processor to it. I didn’t touch any sliders:
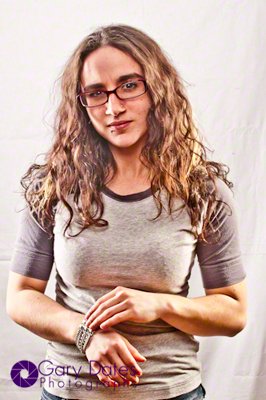

The image on the right is the result of improvements to LR….and for most normal editing these are welcome improvements, but in this case I like the old processing better, so its great that we can choose which processing engine to use in LR 4!
No Smart Objects – For Now
This same new processing engine that I’ve been gushing over makes it impossible to open files that have been edited in Lightroom into Photoshop CS5 as Smart Objects without loosing edits made via the new processing engine. WHAAAAAAAT???? For the way I work, this sucks big-time, to use a technical term. You can guess where this is going, right? Yup! Ya gotta wait for CS6 before you will be able to do the same sort of Smart Object coolness we all now take for granted with LR 3 and CS5. So yes folks, Adobe does it again…..forcing us to buy the “upgrade.” However, they did not totally leave us in the lurch. There is a “release candidate” version of ACR (v6.7) that you can install in Photoshop CS5 that WILL allow you to open images as Smart Objects that still retain the new processing engine edits. You can get it here. However, you can’t further edit them in ACR without converting them BACK to the previous processor, which then forces those images to go back to the beginning…..forcing YOU to re-edit them with the previous controls. WHAAAAAAT????
Long-story short, you can install ACR v6.7 in Photoshop CS5 and open an image edited using the new processing engine in LR 4 as a Smart Object in Photoshop CS5 without loosing those edits, but you CANNOT further edit in ACR using the new processing controls. This is the bone Adobe throws us. Thanks Adobe, big of you!!
Basic Editing
OK, back to gushing. Here is a screen grab of the old Basic panel in Lightroom 3 on the left, and the new Basic panel in LR 4 on the right:
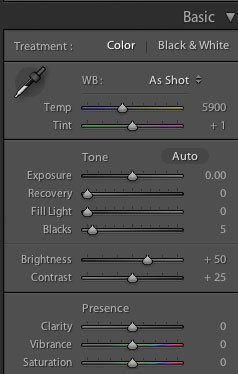
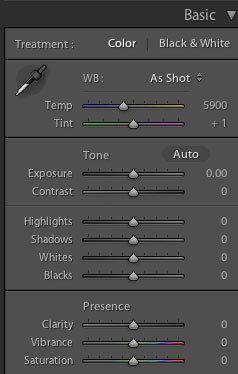
Compare the “Tone” section, and you’ll see that the Recovery and Fill Light Sliders are gone. The Contrast slider is now underneath the Exposure slider, and we have 3 new sliders; Highlights, Shadows, ans Whites. Additionally, every slider’s default position (no adjustment) is in the MIDDLE of the slider track, and every slider darkens to the left and lightens to the right, except Contrast which does what it always did, which was brighten highlights and darken shadows.
Right off the bat, just know that the Highlight slider takes over the function that the Recovery slider performed, which is to allow you to get back highlight detail that gets lost due to the limited dynamic range of most DSLRs. However, it goes even further in that it allows you to INCREASE highlights as well, which the Recovery slider could not do. Even better, the way that LR 4 renders highlights in general has been improved, so without even touching a slider, highlights are rendered with more detail than they were in LR 3. Here is a screen grab of a photo that has clipped highlights. In Lightroom, if the Highlights Clipping indicator is activated, any blown-out pixels are rendered as red. So the sky on the left of the frame is clipped anywhere you see red.

Here is another screen garb of the same photo, but this time I used the new processing engine in LR 4. I did not touch a single slider. LR 4 found clipped pixels and automatically rendered the photo with those highlights toned down! If you look closely, you can see a few red pixels, but I can easily use the new Highlight slider to tone those down as well.

The same is true for shadow areas. LR 4 will render underexposed shadows with more detail and less clipping than before. This is a bit more difficult to illustrate, because the controls for shadow adjustment have changed. Nonetheless, I will try to show the difference. Below is a portrait, cropped in where there were deep shadows in girl’s neck.
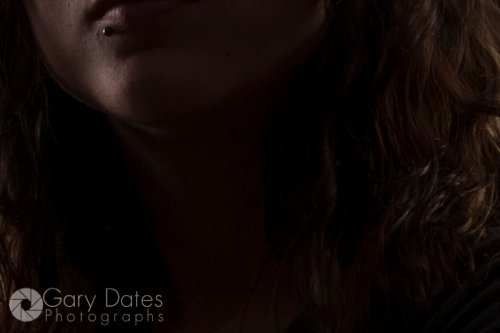
The photo was severely underexposed, so the shadows were very dark. Most digital cameras are very poor at rendering shadow detail…..they introduce a lot of noise, so it is hard to get back detail without brightening the noise as well. Here is a photo that I edited using LR 3 processing:

I first set the Exposure slider to +4.00, and then set the Fill Light slider to +30, in order to try and get the shadow detail back. As you can see, the level of noise is fatal. No way can I use this image as-is.
Here below is the same crop, but rendered with LR 4 processing. since there is no Fill Light slider, I used the new Shadows slider set to +50, and set the Exposure slider to +3.00:

There is still visible noise, but it is much less, and much easier to clean up using the Luminance and Color sliders under Noise Reduction in the Details panel. Plus, the color isn’t over-saturated as it is in the previous photo using LR 3 processing. Below is another grab after I applied Noise Reduction in LR 4:

Remember, this photo was very underexposed with really dark shadows in the neck area. So LR 4 does a much better job of bringing back highlight and shadow detail, which means it virtually expands you camera’s otherwise limited dynamic range!
New adjustment Brush and Gradient Tool
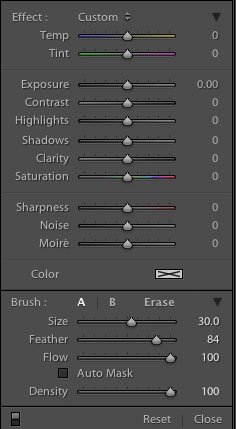
Here is a screen grab of the Adjustment Brush options for both the old adjustments available in LR 3 on the left, and the new adjustments available in LR 4 on the right. I won’t show the Gradient Tool’s adjustments because they are exactly the same. Besides the new Temp and Tint sliders,the new tone sliders replace the old, and under the familiar Sharpness slider we have 2 new sliders; Noise and Moire.

How well does the Noise adjustment do it’s job? Here is an image at a 200% crop, shot at an ISO of 3200. On my Canon 5D, this is still not bad, but hopefully you can see some noise:

Now, here is the same image at the same crop, but removed noise by painting with the Adjustment Brush’s Noise slider set all the way to the right at +100. Now, this is too high, but I wanted to show y’all that it works:

If you look on the left side of the above image, you’ll notice that over the suspension tower of the Verrazano Bridge, it is less noisy, but also a bit less sharp. that’s because I went too far at +100. I find that a setting of @ +60 at the most is a good compromise….less noise but still retails enough detail to be usable. Now, I can’t think of a situation where you’d want to paint in more or less noise, but its nice to know you can!
Moire patterns are what happen when you scan in an images from, say, a magazine. You get this pattern from the printed dots. Typically, I would slightly blur the image just enough so the pattern disappeared, and then sharpen it to get back to something reasonable. Unfortunately, I cannot find a single scan to test this new slider on, so I can’t comment on its efficacy. Sorry! Hopefully I’ll be able to test it later, but this article is taking more of my time than I planned already so for now I’ll pass.
White Balance Brush!
This is HUGE! Now you can selectively paint in white balance adjustments to any are of a photograph using the Adjustment Brush, or the Gradient tool. The fact is, both of these adjustment tools allow you to paint in any combination of the new Basic adjustments, PLUS the addition of Temp and Tint. This takes LR 4 to a whole new level. You can now correct for the color shifts created by 2 different light sources!
Here is an image I shot with my camera’s White Balance set to Tungsten. That forced the ambient sunlight to go cooler….much cooler. I used a 1/2 CTO gel an a single off-camera flash aimed at the model to correct her skin-tones:

The following image I edited in LR 4 using an Adjustment Brush with the Tint slider at around +30. I simply painted the new white balance on the background vegetation. I did not ouch the model at all:
I know it looks like I lightened the model’s skin. I didn’t. It is just the way the warmer tone makes the skin appear lighter. Now, I happen to like the original image. I wanted to cool down the ambient light and warm up the model with a CTO gel in a flash. I just wanted to show y’all how effective this is!
Chromatic Aberration Sliders GONE
I’m running out of gas here. in LR 3, way down in the Lens Corrections panel, we could adjust Chromatic Aberration via 2 sliders. One for Red/Cyan and one for Blue/Yellow. They are gone…replaced by a simple checkbox. If you want to correct for Chromatic Aberration, you simply check the box! Guess what? It works!! At least it did on the few images I tried it on. You’ll have to take my word for it because I just don’t have the energy to upload examples for what to me is a pretty trivial feature. The bottom line is, you have this checkbox, and it’ll either work well for you or it won’t. You don’t have choice because even using the older processing engine, you STILL get the checkbox. The sliders are permanently gone.
Conclusion
I like the upgrade. I like that it doesn’t cost an arm and a leg. The fact is, LR 4 KILLS Apple’s Aperture, so I’m staying with LR and only using Aperture to tether my 5D. I hate the fact that I cannot edit Smart Objects from LR 4 in Photoshop CS5, and I think that Adobe is being shitty by throwing us a barely usable bone with this interim ACR v6.7 release. When Photoshop CS6 comes out, it’ll have the new ACR v7 plugin, nd that will have the new processing engine that LR 4 has. That means full Smart Object editing in both LR and PS will return.
Still, I recommend this upgrade. I’ve been using LR 4 for a week now, and it rocks. THe ability to paint in White Balance adjustments is worth the upgrade alone in my opinion. Now you can buy those cheap-ass Chinese studio strobes on eBay that don’t have the correct white balance, and do it in Lightroom 4! Well, I’m just kidding on that score. It is way more complicated than that. For example, what if you had 2 different light sources aimed at the same subject? But I digress. The bottom line is at $149 retail and $79 upgrade, to me this is a no-brainer.