So, Who Cares?
Yea, I know it seems a bit creepy and egotistical to assume that anyone should care how I made a photograph. So right up front, I’m writing about it because every I time shoot, I learn something new. I am a firm believer that you cannot learn photography by sitting in a classroom, or going online and watching tutorials, or even reading books. You have to get the camera in your hands and USE IT! So I wanted to share the techniques I used here, in hopes that at least some of you might want get out your cameras and give them a try. That’s pretty much all there is to it….I’m just trying to be useful…..while I continue my quest for world domination.
So here’s the image:
It is basically built from 5 separate files. they are:
- The image inside the iPad
- The iPad
- The ghoul
- The background
- The knife
The image inside the iPad was shot on location in a friend’s kitchen. The ghoul was shot in a studio. Both of these were shot using studio strobes; 3 Paul C. Buff Einstein 640s to be exact. They are great strobes for the money, and i sorta love ’em. The background was shot late in the afternoon inside a fishing warehouse in Belford using ambient light only and a 30 second exposure. The knife was shot at the kitchen location because when I shot the ghoul I had forgotten to bring a knife, so I had to add it in later. (Note to self….MAKE A LIST WHEN YOU SHOOT ON LOCATION!!!!!!!).
Break It Down
I’ll start off with the easy one; the background shot. Here it is by itself:
I simply put my camera on a sturdy tripod, set my exposure for 30 seconds at f/8, and my ISO at 400. Why 400? Well, I forgot to bring my remote shutter lock. My camera’s shutter speed maxes out at 30 seconds (so does yours by the way). At a lower ISO, I would’ve needed to open the shutter for longer than 30″, which would’ve been my preference. The only way to do that is with a remote shutter release (Note to self……MAKE A %$#$#@ LIST WHEN YOU SHOOT ON LOCATION!!!!!). Consequently, since 30 seconds was all I had, I needed to raise my ISO from 50 to 400 (3 stops) in order to compensate. At any rate, it was still pretty easy. The only other thing I should mention is that I chose a focal point about 1/3 into the scene. this is a simple rule of thumb when you’re too lazy to figure out the hyper-focal distance. That’s how I was able to get the scene reasonably sharp front-to-back.
In terms of focal length, I shot pretty wide at 28mm, which on a full-frame body is fairly wide. In a case like this, it is very important to make sure your camera is level; any offset will cause vertical distortion. Wide focal lengths elongate the scene as it is, and adding vertical distortion really throws things outa whack, to use a technical term. So that’s it for the background in terms of shooting. I did a bunch of post-processing on this image, but I’ll address that later.
The Ghoul

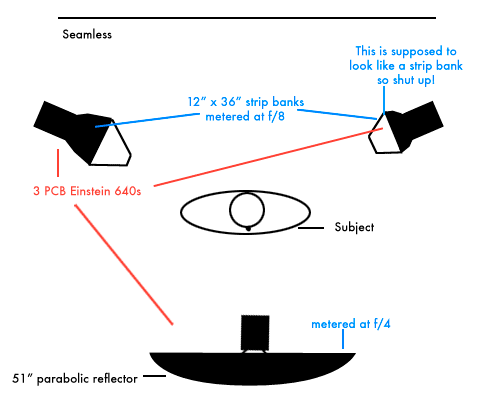
As I said, this was shot in a studio, against a white seamless background. I used 3 studio strobes in the following configuration:
The 2 side-lights with strip banks actually served as the key (main) light, and the front light was just for fill. The reason for this is that, well, I just think it creates awesome-looking light! Besides that, I knew I was going to extract the model from the background later in Photoshop. This lighting setup gives me the greatest flexibility in dropping the subject into another background, because she is essentially being lit from 3 different sources. ONE of them will most likely be close to where the light source in the subsequent background is, so it almost always looks natural. If not, I can always tweak it in Photoshop to get there. I should also add that the person who was assisting me, Diane, was holding a speedlight above the model pointing down to the top of her head. This created some nice hair light. Thanks Diane! You can see her standing on a foot stool at camera left at the edge of the frame.
I shot hand-held with a 50mm focal-length on a full-frame body. My camera was set at 125″ @ f/11 and ISO at 50. The key here is that the exposure is actually set with the lights. I never changed my camera’s settings at all. I simply adjusted the light output until I got what I wanted. There was no ambient light influencing the scene. If I took a shot without the strobes, the frame would’ve been black.
The Kitchen Scene
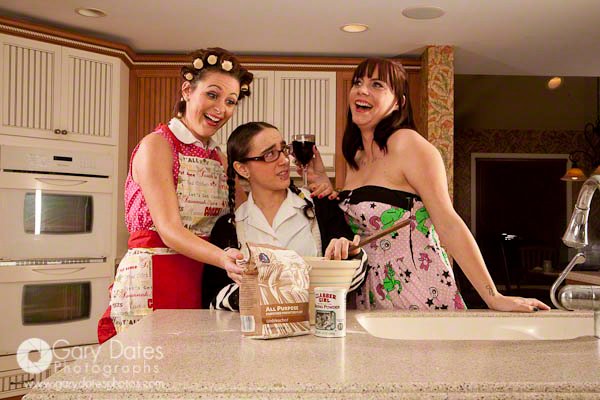
The kitchen scene was the most complicated in terms of planning and execution. I had to schedule 3 models, plus the location, plus an assistant, and bring my lights. happily, it all came together pretty quickly, and by pretty quickly I mean i had to wait 2 weeks in order to get everyone together at once. Anyway, here is the unretouched image:
I used the exact same lighting setup as the previous shot. The real story here is the models; Nani, Tiffany, and Julie. They were just great. All I had to do was provide a bit of direction, and shoot! Of course, Diane and I arrived on set an hour before the models and got the lighting setup, metered, and ready-to-go, but the actual shoot was successful because of the 3 models. BTW, Julie, who is on the right, also served as the ghoul in the previous shot. She is an actress AND a professional FX make-up artist as well! How could I go wrong?
My camera settings were exactly the same as before. My go-to settings are almost always a shutter speed of 1/125″ @ f/11, and the lowest ISO I can get way with. In this scene I shot wide at 28mm with my camera on a tripod at just above waist height and leveled. The parabolic reflector was just touching the top of my lens, so I was able to direct nice, soft light as fill at the scene.
The Rest
That leaves the iPad shot and the knife. These 2 shots were easy, and I don’t think I need to describe what I did. I’ll just show you the out-of-camera shots of both:
I flipped the iPad shot to get the hand on the right side, and extracted the knife to drop into the ghoul shot. Nothing fancy here……pretty standard stuff.
Photoshop
The real story here is what I did in Photoshop. I’m gonna have to devote another blog post to that, because this one is already too long. At least you can get a sense of the shooting involved. In case you’re wondering how I learned these techniques, I’ve provided a few links to 3 amazing photographers; Joel Grimes, Dave Hill, and Platon. Dave has behind-the-scenes videos and you can see his incredibly complex lighting setups. Joel takes a much simpler approach, and it is his approach that I copied here. Platon shoots super-wide angle portraits, and has made quite a career for himself. Looking at his work really opened my eyes to wide-angle shooting!
I hope you find this article helpful. Until next time, BYE!
Tags: lighting, photography
[…] article is supposed to accompany this one. Oh well. I kept putting it off because explaining anything having to do with Photoshop is […]
Hi Gary – great journal of the ‘how to’. I liked that you recapped the set-up. The final photo turned out fantastic!