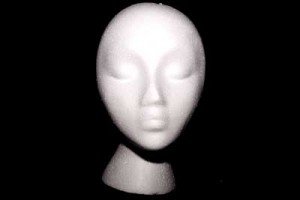
Lately I’ve been practicing lighting technique, using one to three speedlights. I’m gonna attempt to give y’all the skinny on beginning flash photography, and especially why it’s almost never a good idea to slam your subject with a direct flash that is on the same axis as the lens; i.e. straight in their face. I’ll take you through a few setups, and hopefully clear up some confusion along the way..
first of all, the absolute BEST resource online for what follows is David Hobby’s Strobist website. Read what I wrote, then go there for the expert info. Strobist is where I learned how to best use my speedlights, and I go back there a lot. I can’t recommend it enough.
The biggest stumbling block for most people is not knowing how to trigger their flash when it is NOT on the hot-shoe. the image at right, of course, being the hot-shoe.  For those new to all of this, the hot-shoe is where you attach your brand new, way over-priced Canon 430EXII or 580EXII; or if you speak Nikon, an SB600 or SB900. The aforementioned flashes all go for several hundred dollars each. They all have very sophisticated capabilities, like being able to automatically adjust flash-strength based on camera exposure (TTL, or Through The Lens), and both Canon and Nikon have their own proprietary systems for doing so. On Canon it’s called E-TTL (Electronic Through The Lens), on Nikon it’s called iTTL. Nikon also offers what is called CLS (Creative Lighting System), which on some models allows your camera to talk to off-camera Nikon speedlights….very cool. As of this writing, the only Canon camera that offers similar capability without having to buy a Canon accessory that fits on the hot-shoe is the 7D.
Both of these systems are very sophisticated, pretty complicated, and by-and-large totally unnecessary for getting great images via off-camera flash. Hey, I’m not sayin’ you won’t be able to do great things with either system, but I am sayin’ you’ll spend a TON of money doing so. The fact is, if you understand how to set manual exposure, you can easily learn how to use much less expensive flashes and get great results. The minimum requirement for any flash is that it has be able to have it’s flash strength adjusted manually. I’m telling you, it isn’t as hard as it may seem to figure out how to get the proper flash strength for your shots.
Flash Angle

Front Flash.....yuk.

One flash at camera right

2 rim lights, 1 front lowered and aimed up.

Raised front light
I started playing with a styrofoam head to help me figure out how the shadows were influencing the “model”. This turned out to be pretty instructive. I took a shot with the flash attached to the hot shoe, which you can see at right. I think we can agree it is pretty horrible. Next, I shot with the flash to camera right and up high……a pretty common lighting technique that yields pleasant results. This flash was at 1/4 power. Still, it’s kinda boring and there’s too much shadow on the left side. I could’ve put up a reflector to bounce some light back into the shadows, but I wanted to try some different techniques.
I wound up placing 2 flashes behind the model, one at each side pointing slightly forward, both set at 1/8 power. I had to place a gobo between these 2 flashes and the camera as light was spilling into the lens. I lowered the key light, placed it directly at lens axis and aimed it up. I also decreased its flash strength by 1 stop to 1/8 power. It looked kinda cool with 2 rim lights defining the edges, but there was. The upward angle of the light was creating a dark spot on top of the head, and some shadows above the cheek bones and eyes. I thought it was OK, but wasn’t really happy with those shadows created by aiming the front light upwards.
Finally, I lowered the strength of the 2 rim lights by 1/2 stop and angled them so they were just raking the side of the head, raised the front flash up above the camera (still centered) and aimed downward. WOW!! What a difference! I was amazed at how, um, attractive she….er….it looked.
You Can’t Meter Flash
This is basically how I arrived at the proper angles, but how did I get the right exposure? how did I make the background, which was white seamless, go black? Simple really. I exposed FOR the flashes and made sure I canceled any ambient by stopping down to f/22. At that aperture setting the ambient to flash ratio was…..well…..I can’t remember exactly, but obviously the flashes were much stronger than the ambient light. Plus, the head was about 5 feet from the seamless, so the fall-off from the flashes ensured the background wasn’t illuminated at all.
Since the light from a flash has a duration of around 1/1000 of a second (give or take a few 100ths depending on flash strength), you can’t use your in-camera reflective meter. You COULD go buy an incident light meter. They START at @ $170. Or, you could get good at judging exposure manually and in a few frames have the correct ambient to flash ratio for the look you’re after. The key is being confident setting exposure manually.
It’s All About Light Ratios
One strategy is set a base exposure for ambient light, usually underexposed, and add a flash as your key (main) light. For example, you are shooting a model outdoors. you would set your shutter speed to your camera’s sync speed or under….say 1/125. You would meter the scene and purposely underexpose 2 stops, which in this case is f/4. Take a test shot, and you should see a pretty dark picture. Now add an off-camera flash. You can arbitrarily set it to 1/4 power and take another shot. This frame will tell you all you need to know. You will either stop down your aperture to take the flash into account (which will darken ambient), alter flash strength if you want to maintain ambient strength, or find that the initial settings are perfect. Personally, I like to be at f/8 in the beginning, so I know I have enough depth of field. I can always change the ratios to taste later. For example, I could stop down the aperture to f/11 and stop up flash by 1 stop…..same exposure, different result.
What Speedlights Should I Get?
The answer to this question will surprise you. First of all, it should be pretty obvious that I didn’t use any TTL functionality, nor did I have my Canon 5D trigger the flashes (more on this below), so I didn’t need to go spend a ton of money on several 580EXII’s or 430EXII’s. You can find many inexpensive, and by that I mean under $100, speedlights that allow you to manually adjust flash strength and can slave via line-of-sight triggering (meaning the flash will fire if it “sees” another flash pop). I spent $160 on a Lumopro speedlight, because it has 4 ways to trigger (slave, PC cable, hot-shoe, 1/8 mini-jack), and at full power it is very bright. I can lower the strength in full stops to 1/64 power and adjust the flash focal length 24-105mm, so this gives me plenty of flexibility. I already owned one 430EXII, and it is equally adjustable (more so in that I can increment flash strength by 1/3 stops), but I NEVER use it in E-TTL mode….only manual. I also have a Digital Concepts speedlight which broke so it won’t fire from the hot shoe, but it WILL slave so it is very usable. It is somewhat limited as I can only adjust flash strength to 1/16 power, but I still use it alot. That’s 3 speedlights. I’ll buy another Lumopro when I get some money. I’d like to have 4 speedlights, since there have been time when I wanted a 4th light. Plus, having a backup is not a bad thing. So, I’d say get one or two of the cheapest hot-shoe speedlights you can find that allow you to manually adjust flash strength and focal length.
How Do I Trigger the Flashes Off-camera?
This is the tricky part. The “gold standard” is Pocket Wizard. They make radio transceivers that are rock-solid, dependable, and support TTL. You’d need to buy at least 2; one for the camera’s hot-shoe and one for the speedlight. When you hit the shutter button, the flash fires…..just like it was on the hot-shoe. The Pocket Wizards boast triggering over great distances too. The bottom line is, they’re the best. They are FREAKIN’ expensive. It would cost @ $400-$500 for a pair. YIKES!
I’ll cut to the chase. I bought a transmitter that fits on my camera hot-shoe and a receiver that attaches to my speedlight. Together they cost @ $30……yes….not $300…..$30!! There are several low-cost radio transmitter/receiver flash triggers available. I got mine on Amazon and they are made by Cowboy Studios. So far, I have not had ONE misfire, and I used them on a paid product shoot in adverse conditions (beach, cold, strong on-shore wind). I must’ve fired thousands of flashes with them by now. Since they are so inexpensive, I bought a backup set! OK. The build quality is flimsy compared to the Pocket Wizard. They are not made to take a beating, and when I get enough of a client-base to justify the cost, I’ll probably go get a couple of Pocket Wizards like every other pro. But for now, I love ’em!!!!
That’s my story and I’m stickin’ to it.
