Failure Is Your Best Friend
I don’t know of any artist, or anyone else for that matter, that hasn’t experienced failure. I believe Woody Allen said, “If you aren’t failing, you aren’t trying hard enough.” The fact is, we all learn a lot more from failure than from success. I want to share my latest failure with you.
I was hired to do some product shots for a retail store. Having worked with them many times in the past, they trusted me to shoot the products without them needing to be there during the shoot. That was probably mistake #1, but maybe not. I took this as an opportunity to be more “creative.” This was definitely NOT a good idea, as it turned out. Nonetheless, I figured I had nothing to lose if I shot the product in a more conventional way, and then try something new. This turned out to be smart. I covered my ass.
The Product
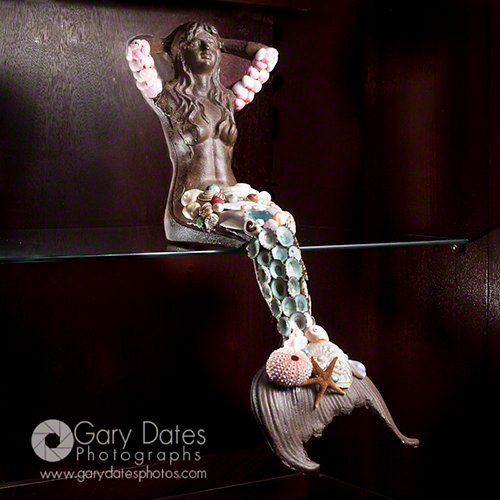
The item was a large cast iron sitting mermaid, hand-decorated with various shells in multi-colors down her mermaid tail and along her arms as well. Here is the final client-approved shot to give you the….er…picture.

Location, Location, Location
I wanted this thing to be in context; as in sitting on a bookshelf, as opposed to a seamless background studio shot. So I first shot a few test images in my house. One possibility was a shelf near a window. Window light can be great light, so maybe I’d get lucky and not have to set up lights. The thing is, I finally got over my obsession with studio strobes and flashes, whereby I would light every damn thing whether it needed it or not. Lights are also not cheap, so the tendency is to use ’em in order to justify buying ’em. That isn’t the best strategy. Figuring out how to get the best result is the best strategy. I had recently rediscovered natural light, especially window light as a LIGHT SOURCE. Now I am always thinking about available light first; many times it is all you really need! Lights are tools, not toys, as it turns out.
Regardless, here’s the test shot using window light:
You’ll want to click on the above image to see a larger version in order to best understand what follows. I shot this image hand-held at 1/40, f/1.8 ISO 100 at 50mm. I think it’s pretty obvious what the challenges are. The mermaid is a dark copper color, and the shells a very bright….in other words, high-contrast. Further, she has depth; meaning I couldn’t use narrow depth-of-field or at least 1/2 of her would go soft. If you look at the larger image you’ll see that clearly. That meant I had to stop down to about f/11, so hand-held was out. But she’s getting lost in the books, so rather than pursue this I bagged that location….too complicated.
I put her on a wooden wall-unit with a glass shelf. The wood finish was semi-gloss and dark red-ish brown. This was NOT gonna work at all, because her dark color would almost camouflage her if I exposed for the bright shells. This is when I got my bright idea: why not back-light her for separation, and add a front key light? I could hide a flash in the back corner of the shelf camera left, and hit her with a front key light in the form of a shoot-through umbrella’d flash for nice soft light. Here’s the first shot with just the key:

A few things to note at this point; I knew the final image would be a perfect square, so I didn’t care about the right side of the frame. Secondly, this first shot was at f/4…..DoF still way too narrow. Still, I sorta liked the way the semi-gloss finish was illuminating the wood behind her, creating a bit of separation. However, the camera left side of her was totally in shadow. I’m getting excited cuz I can’t wait to see what the rim light will do….which I’m guessing will a) separate her from the background, and b) light up the shadows at camera left.
I’m not gonna bore you with the whole process. It took waaaaay longer than I thought to get the right ambient/flash exposure combo. Here’s a shot about half-way down the rabbit hole where I sorta, kinda got everything dialed in OK:

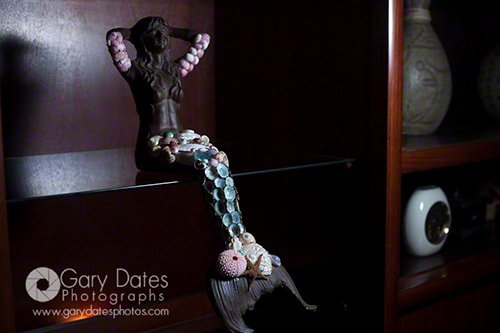
I’m now at f/8, I have some nice rim light, the shadow is gone, and I’m feeling lucky. You can see the flash peeking out of the lower left edge of the frame above. It is shining up through the glass shelf. Still, I know she’s too dark in the upper-half, and I’m getting too much shadow across the shells on her tail, but I’m getting there. 30 frames (yea I know!!) later, I’m THERE!!!:

Success….NOT!
So I feel pretty proud of myself. I have some nice separation, and things look pretty good overall so I packed it in and went to sleep. The next day I took a look at the image and thought, “She looks pretty scary.” The shadows are making her look like something out of “True Blood”, and the shells are still getting too much shadow. I sent the image to my client, who pretty-much said the same thing. FAIL! I spent a grand total of 4 hours on this one shot! Arrrrrrrggggghhhh.
Conclusion
Let’s take another look at the final APPROVED image:

This makes the most sense. The top half is backed by a light wall, she’s evenly lit from the front by a shoot-through umbrella….pretty standard stuff really. But that’s the point…..it’s a product shot, which means the purpose is for people to be able to actually see the product and NOT notice how it was lit. DUH!
I hate to fail….really hate it. But I learned a lot, and honestly if this wasn’t a product shot that was supposed to get people to BUY the thing instead of scaring them away, it would’ve worked. So the point is, you can read all of the books you want on lighting, watch all of the online tutorials too, but ya gotta DO IT if you wanna get better. That’s it….no big revelation, just grab your camera and go shoot stuff….it’s the only way.
Well, OK. If you land a gig assisting a master photographer, that’s probably the BEST way to learn, as you’ll see a pro at the top of his/her game problem-solving at the speed of light. Since I don’t have such a gig, I am forced to figure it out on my own. I’m guessing so are you. The key here is “figure it out.” Experimentation is the quickest way to learn anything, so please get over yourself, set yourself up for failure, and go for it!

[…] have to get used to failing. No one, I mean NO ONE takes great photos every time they open the shutter. When you look at a […]