The Problem
Today’s digital camera has a limited dynamic range. Therefor, when you are shooting a scene that includes the sky and the ground, if you expose for the ground the sky gets blown out, and if you expose for the sky then the ground goes into deep shadow. Neither of these options represent the way our eyes see that same scene. What to do?
In terms of an in-camera solution without using any filters, there’s really only one….and I’m not trying to be a smart-ass here. Just wait until the light is such that the clouds and sky are more or less at the same brightness level as the ground. That can happen during a short time-window in the pre-dawn morning or just-after-sunset evening. This usually requires a tripod, not to mention infinite patience and more luck than most of us are willing to rely on.
Solutions
There are several solutions if the above is unacceptable…as it should be. 🙂 Here they are:
- Neutral Density Graduated Filters
- Polarizing Filter
- Software
- Lightroom
- Photoshop or Elements
- HDR Processors such as Photomatix
Polarizer
A circular polarizing filter screws onto the front of your lens. Basically, it allows you to bend light in various ways. One of the cool things it does is let you shoot into water by eliminating surface reflections. Click on it for larger image:
In terms of shooting the sky, it can add a bit of contrast to clouds and deepen the blue of the sky, but it isn’t going to do much in the way of equalizing the sky to the ground. Here’s an example of a sky shot without and with a polarizer. I really over-did the polarizer’s adjustment so you can see how much more saturation you can get. It really is a great example of a bad use of the polarizing filter, but hopefully instructional in terms of what it can do. Click on it for larger image:
Neutral Density Graduated Filter
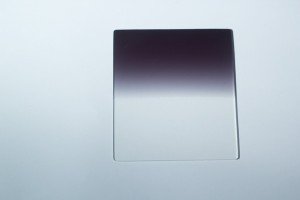
This is really the best solution in terms of getting the shot on-scene, as opposed to trying to fix it later in post production. An ND Grad filter looks like this:

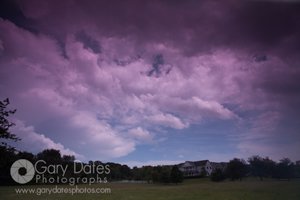
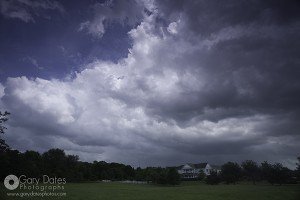
The darker area is neutrally tinted so it darkens without adding any color…..hence “neutral.” It transitions from darkened to clear….hence “graduated.” You can buy these in varying densities….usually 1 stop to 3 stops. You hold it in front of your lens and line it up so the transition lines up with the horizon line. You can also buy a holder that attaches to the front of your lens so you don’t need to hand-hold the filter. I’m too cheap to buy one myself, even though they definitely save some hassle. Its a minor pain to hold the thing infront of the lens for sure. Below is an example with and without the filter. I exposed for the ground in the left image, and did not change my exposure in the right image:
I used a 3-stop ND Grad on the image on the right. If I felt it was too dark I could’ve used a 1 or 2 stop ND Grad. If the sky itself was even brighter, I could’ve stacked 2 filters together to darken the sky more. However, I discovered that when I stack my filters you get a magenta caste to the images:

Pretty bad right? I’m sure its because I buy el-cheapo filters. I have one Cokin 3-stop ND Grad that was @ $25 at the time, but is now @ $42. I also picked up a pack of 6 filters, 3 grads and 3 ND stop-down filters for $18 on Amazon. I believe the culprit are these super-cheap filters from Amazon. You can pay A LOT more for these square filters, and no doubt they won’t introduce any color shift. It isn’t a big deal for me because I can easily remove that purplish-magenta caste in Lightroom or Photoshop. You can also buy round ones that fit onto your lens, but they are more expensive. If you go that route, buy one for your largest lens filter-size, and then pick up step-up rings for your smaller lenses. That way you only need one filter for all your lenses.
Conclusion
I must tell you, I NEVER take an image right from the camera and consider it finished, even when I use a filter. I always do at least some post-processing. Here again is the image from above on which I used a 3-atop ND Grad:
Here is the same image after processing:
I’m not going to justify it. I proudly admit that I process just about everything I shoot. Its OK if you don’t like it. Admittedly I don’t go this heavy on all of my images, this is pretty radical. But it was a boring image before, and it is much less so now! I use Lightroom 4 and Photoshop CS6. I know these image editing applications well, and am totally comfortable with using them. HDR (high-dynamic range) processing is something I rarely do, so I’m no expert. Basically, it allows you to combine several of the same image shot at varying exposures, usually of 1 stop or more. This allows you to create an image that appears much closer to what your eye saw. HDR has become a huge fad, and there’s a certain over-saturated look that is quite popular. I’m not a fan of that look. I tend to use HDR to make my images look more realistic. A great resource for anyone interested is Trey Radcliffe’s blog, “Stuck In Customs”. He’s an HDR expert and his work is awesome.
Learning Post-Processing
What if you don’t know much about post-processing? Lightroom is a great place to start because it is relatively inexpensive at $150, it is also easy to learn, and best of all, you don’t need to know everything about it to begin using it. Photoshop is another story…..even Photoshop Elements is pretty complicated due to layers, layer masks, adjustment layers, and more. Therefor, I recommend starting with Lightroom. Beside being a great editor, it is an awesome file manager for your photos! It is meant to be a self-contained program so you don’t need Photoshop to go from start to finish with an image. So before this turns into an ad for my Lightroom class, I’ll stop. 🙂


