You may recall I wrote an article on how to photograph an object against a white…..and I mean pure white…..background using gear that costs a little over $1000, not including the camera. Not only that, it wound up being a royal pain-in-the-a** to do it. Well, I have since found a MUCH easier way to do the same thing, using common household stuff such as a plastic storage tub from K-Mart. Even if you include the cost of one or two speedlight flashes, the gear costs MUCH less…..$200 tops….than the gear in my first article.
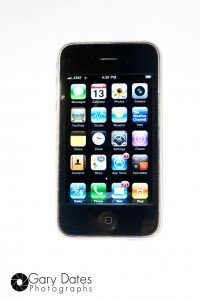
The deal is, sometimes I need a way to create a product shot that has a white background. Such an image might be used in an ad, and if the background is pure white, the graphic designer can easily mask-out the background. Below at right is an example, shot using the method described below. You can click on it to see a larger version.
This is my iPhone. It has seen better days, so if you look at the larger version you’ll see some scratches and smudges. I’m pointing this out because if this was a REAL photo for an ad, the product would need to be perfectly clean, as in spotless! Also, there would need to be a certain amount of retouching involved, to make the sides of the iPhone more clear. I just got lazy and didn’t feel like cleaning the thing up, and doing any retouching……so sue me…..but I digress.
The Gear
Here is a list of what you’ll need:
- One Plastic Storage Tub from K-Mart @ $10
- One piece of white translucent plexi-glass from Lowe’s, about 18″x24″ @ $8
- A speedilght: Vivitar makes a few for under $100. I would recommend a Lumopro 160 for @ $160.
- A way to trigger an off-camera speedlight. I used Cowboy Studios triggers @ $25 on Amazon
- OPTIONAL – Lumiquest Promax Softbox III @ $36
Depending on which flash you buy, we’re talking @ $200 or less for the above. Plus, if you get the Lumopro flash, you can trigger it with a PC cable, a hot-shoe cord, an 1/8″ connector, or slave it. However, be aware that this flash is MANUAL only! It does not do any TTL metering. I have nothing against the ETTL system from Canon, or the CLS system from Nikon, but man-o-man a flash from either company is expensive!
How To Do It
Right off the bat, I did NOT invent this technique. I am totally stealing it from Bryan Peterson who has a video on Adorama TV about this very thing. I’m just showing you how I adapted it for my needs…..so don’t sue me….but I digress again.
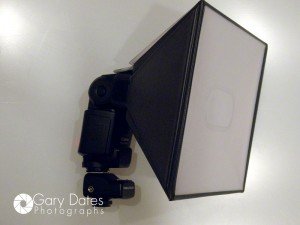
you take the storage tub and line it with white paper. you then take a speedlight and attach a radio trigger to the hot-shoe, or use whatever triggering method you’ve chosen. I attached a Lumiquest Promax Softbox III to get more even distribution of light from the flash:
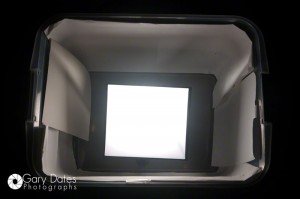
You place this assembly inside the storage tub, and place the plexi-glass on top. Obviously the plexi-glass serves to diffuse the light and create the surface for the “lightbox”. Here is an image of the flash assembly inside the storage tub, which is lined with white paper to get the maximum amount of light from the flash to reflect up into the plexi-glass:
Below is the tub with the plexi-glass on top. You can see that the light is evenly distributed, and we now how a fully-functioning lightbox on which to place items to photograph!
That’s pretty-much all there is to it…well not really. You now have to figure out the proper exposure, which includes figuring out the flash strength plus ambient.
The Proper Exposure
Normally, you could either throw a hot (continuous) light on the object to be photographed on the lightbox, or hit it with another flash from above. If you don’t light the object from above the lightbox, it will just be a silhouette because it will be back-lit only. Look at the following shot:
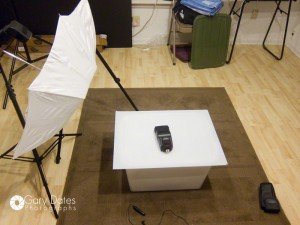
C’mon, ya gotta give it to me! That looks PRO-fessional! I placed the Lumopro speedlight on the lightbox (this speedlight has nothing to do with the exposure….it is just an object to photograph), and added an el-cheapo Digital Concepts flash with a shoot-though umbrella placed camera-left. I simply played with the flash strength of this el-cheapo flash until I got the shot I wanted. This flash has a “slave” mode, whereby if it detects another flash firing, it too will fire. Thus, I didn’t need to trigger it with anything. If I hadn’t used another light, the object would’ve just been a silhouette. Below is a photo of the setup:
As far as exposure, I always set my camera to 1/125 at f/11 when using any sort of flash lighting. I do this in order to kill ambient light….more on that below. Also, I usually set my speedlights to 1/4 power. Why? Well, ya gotta start somewhere, and these setting almost always get me in the ballpark. I’ll take a test-shot and adjust accordingly. In this case, my camera was set to 1/160 @f/11, and the speedlight that was outside the lightbox was set to full power, because with the shoot-through umbrella I lost about 1.5 stops. The speedlight inside the lightbox stayed at 1/4 power.
What About the iPhone?
Oh yeah….the iPhone. Shooting the iPhone required a much different strategy, because the iPhone itself is backlit. By this I mean that the iPhone’s surface screen emits it’s own light. That meant if I hit it with any external light, I’d overpower the screen completely. This shot requires that you can see the screen in all it’s glory. As a result, I had to use ambient light….that is to say the light from the iPhone itself. That required a 2″ exposure, which meant the camera had to go on a tripod, and just to be safe, I used a shutter remote to avoid any camera shake. Here is the setup:
Some of you might be thinking; “With a 2-second exposure, wouldn’t the lightbox overexpose everything?” Well, no! This is why I love flash photography. Exposure time has absolutely no effect on your flash exposure!! Flash duration is very short. Even at full-power output a speedlight’s flash duration is well-over 1/500, and at lower output settings the duration is even shorter. So if your exposure was set to kill all ambient light, which is usually the case in a controlled environment when using flashes, any adjustment to the shutter speed has no effect at all. Your only consideration is making sure your stay under the flash sync speed of the camera, which in my case was 1/200. This is typical of most full-frame cameras, because the 1st and 2nd curtains have to traverse a rather large sensor. If none of this makes sense, don’t worry about it. All you need to know is that whether or not my shutter speed was set to 1/200 or 2″, if the flashes are the only light source, then the shutter speed is irrelevant, because in both cases the flash duration is much shorter than the shutter speed!
Back to the iPhone. In this case, I NEEDED the light from the iPhone, so I had to create an exposure that would record the flash AND the ambient (iPhone screen) light. So the shutter opens and the flash inside the lightbox fires……recording the white background flash from the lightbox……and the shutter stays open for 2 seconds, drinking in the light from the iPhone. So in this case, I exposed for both the flash and ambient light. The rule of thumb for ambient plus flash exposure is this:
Shutter speed for ambient, F-Stop for flash.
Conclusion
That’s all there is to it! This setup is much easier to deal with, and FAR less expensive to create, than the one in my previous post on this same subject. Here again is the finished front iPhone shot, along with back:
Alright, I screwed up with the shot of the back. That is, besides shooting the back of an iPhone that has clearly seen better days (my new whte iPhone 4s is on the way….YAAAAAYYY!!), I should’ve used the shoot-through umbrella instead of going with the 2-second ambient-plus-flash strategy. You can see that the ceiling lights were reflecting off of the iPhone’s black back, and worse, since my White balance was set to “flash”, the lights are too warm. So let this be a lesson to ya! Don’t listen to me….no wait….that ain’t it. The lesson is, if you are gonna mix light sources, expect to deal with White Balance issues. That is why most photographers who are using speedlights or studio strobes will kill the ambient to make sure ONLY the flashes are lighting the scene. It doesn’t mean you have to shoot in pitch-black darkness, it just means you have to set your camera to an exposure that would yield a black frame if no flashes fired. Remember when I said I always start at 1/125 @ f/11? It so happens this exposure setting will pretty-much kill most indoor lighting.
One Last Thing
You can use your imagination to create some interesting shots. Here I shot some products for a client. I used the lightbox plus another light at camera-right, shooting across to create some shadow. The cool thing is the lightbox created this interesting glow at the bottom of each jar:
You don’t just use a lightbox for shooting commercial products. I took some vitamin E capsules, dumped them onto the lightbox, and attached my 50mm Macro lens to get in close. Here’s the result:
Besides vowing to never put another capsule in my mouth without rinsing it in water first (if you look close you can see all manner of foreign objects that should not be on a vitamin E capsule), I think you’ll agree this is sorta cool, right? I can see playing with this in Photoshop; maybe creating a Gradient Fill adjustment layer with the Blending Mode set to Overlay, or maybe using this as a Photoshop Pattern…..but that is a subject for another article on another day.
The thing is, you can put anything on the lightbox…leaves…..flowers…whatever. Use it as another creative tool! So there you have it…..a way to create images that have that white “knocked out” look without spending a fortune in gear or wrestling with same! Hopefully you are now inspired to create your own cool-lookin’ images. Just remember, if you take you vitamins first, rinse ’em!


Great advice, worth attempting. My wife makes hair accessories (like flower clips and hairbands) for little girls and has long complained about not getting optimum pics. Maybe we’ll try this. Thanks!